

ine 5341
Métodos, Técnicas e Ferramentas para Visualização de Dados no Computador
Aula 3 - Cores
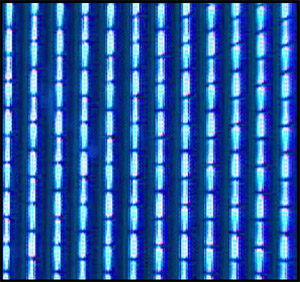
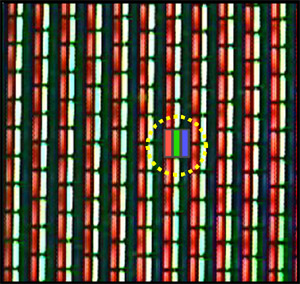
Representação de Cores no Sistema RGB: Exemplo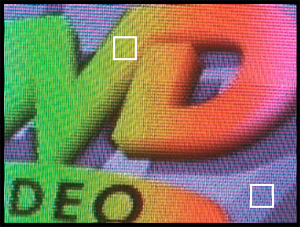
Programação - Cores
| In
the last tutorial I taught you how to display Triangles and Quads on the
screen. In this tutorial I will teach you how to add 2 different types
of coloring to the triangle and quad. Flat coloring will make the quad
one solid color. Smooth coloring will blend the 3 colors specified at each
point (vertex) of the triangle together, creating a nice blend of colors.
Using the code from the last tutorial, we will be adding to the DrawGLScene procedure. I will rewrite the entire procedure below, so if you plan to modify the last lesson, you can replace the DrawGLScene procedure with the code below, or just add code to the DrawGLScene procedure that is not already in the last tutorial. |
|||
int DrawGLScene(GLvoid)                                         // Here's Where We Do All The Drawing
{
        glClear(GL_COLOR_BUFFER_BIT | GL_DEPTH_BUFFER_BIT);     // Clear The Screen And The Depth Buffer
        glLoadIdentity();                                       // Reset The Current Modelview Matrix

        glTranslatef(-1.5f,0.0f,-6.0f);                         // Left 1.5 Then Into Screen Six Units

        glBegin(GL_TRIANGLES);                                  // Begin Drawing Triangles
| If
you remember from the last tutorial, this is the section of code to draw
the triangle on the left half of the screen. The next line of code will
be the first time we use the command glColor3f(r,g,b). The three parameters
in the brackets are red, green and blue intensity values. The values can
be from 0.0f to 1.0f. It works the same way as the color values we use
to clear the background of the screen.
We are setting the color to red (full red intensity, no green, no blue). The line of code right after that is the first vertex (the top of the triangle), and will be drawn using the current color which is red. Anything we draw from now on will be red until we change the color to something other than red. |
|||
                glColor3f(1.0f,0.0f,0.0f);                      // Set The Color To Red
            glVertex3f( 0.0f, 1.0f, 0.0f);                  // Move Up One Unit From Center (Top Point)
| We've placed the first vertex on the screen, setting it's color to red. Now before we set the second vertex we'll change the color to green. That way the second vertex which is the left corner of the triangle will be set to green. | |||
             glColor3f(0.0f,1.0f,0.0f);                      // Set The Color To Green
             glVertex3f(-1.0f,-1.0f, 0.0f);                  // Left And Down One Unit (Bottom Left)
| Now we're on the third and final vertex. Just before we draw it, we set the color to blue. This will be the right corner of the triangle. As soon as the glEnd() command is issued, the polygon will be filled in. But because it has a different color at each vertex, rather than one solid color throughout, the color will spread out from each corner, eventually meeting in the middle, where the colors will blend together. This is smooth coloring. | |||
                glColor3f(0.0f,0.0f,1.0f);                      // Set The Color To Blue
                glVertex3f( 1.0f,-1.0f, 0.0f);                  // Right And Down One Unit (Bottom Right)
        glEnd();                                                // Done Drawing A Triangle

        glTranslatef(3.0f,0.0f,0.0f);                           // From Right Point Move 3 Units Right
| Now
we will draw a solid blue colored square. It's important to remember that
anything drawn after the color has been set will be drawn in that color.
Every project you create down the road will use coloring in one way or
another. Even in scenes where everything is texture mapped, glColor3f can
still be used to tint the color of textures, etc. More on that later.
So to draw our square all one color, all we have to do is set the color once to a color we like (blue in this example), then draw the square. The color blue will be used for each vertex because we're not telling OpenGL to change the color at each vertex. The final result... a solid blue square. Again, the square (quad) is drawn in a clockwise order meaning we start off looking at the back of the quad. |
|||
        glColor3f(0.5f,0.5f,1.0f);                              // Set The Color To Blue One Time Only
        glBegin(GL_QUADS);                                      // Start Drawing Quads
                glVertex3f(-1.0f, 1.0f, 0.0f);                  // Left And Up 1 Unit (Top Left)
                glVertex3f( 1.0f, 1.0f, 0.0f);                  // Right And Up 1 Unit (Top Right)
                glVertex3f( 1.0f,-1.0f, 0.0f);                  // Right And Down One Unit (Bottom Right)
                glVertex3f(-1.0f,-1.0f, 0.0f);                  // Left And Down One Unit (Bottom Left)
        glEnd();                                                // Done Drawing A Quad
        return TRUE;                                            // Keep Going
}
| Finally change the code to toggle window / fullscreen mode so that the title at the top of the window is proper. | |||
                        if (keys[VK_F1])                        // Is F1 Being Pressed?
                        {
                                keys[VK_F1]=FALSE;              // If So Make Key FALSE
                                KillGLWindow();                 // Kill Our Current Window
                                fullscreen=!fullscreen;         // Toggle Fullscreen / Windowed Mode
                                // Recreate Our OpenGL Window ( Modified )
                                if (!CreateGLWindow("NeHe's Color Tutorial",640,480,16,fullscreen))
                                {
                                        return 0;               // Quit If Window Was Not Created
                                }
                        }
| In
this tutorial I have tried to explain in as much detail, how to add flat
and smooth coloring to your OpenGL polygons. Play around with the code,
try changing the red, green and blue values to different numbers. See what
colors you can come up with. If you have comments or questions please email
me. If you feel I have incorrectly commented something or that the code
could be done better in some sections, please let me know. I want to make
the best OpenGL tutorials I can. I'm interested in hearing your feedback.
Jeff Molofee (NeHe) * DOWNLOAD
Visual
C++ Code For This Lesson.
|
|||
|
The Cyclops
Project
German-Brazilian Cooperation Programme on IT CNPq GMD DLR |

